After successfully installing NiralOS EDGE and logging in for the first time, you will be greeted with the Initial Setup Wizard.
The Initial Setup Wizard guides you through the basic configuration required before using the platform. It consists of three simple steps:
- Create your first Tenant
- Create your first Site
- Connect your first Environment (Optional)
Once completed, you can immediately begin managing your infrastructure using NiralOS EDGE.
Note
You may skip the Environment step if you simply want to explore the platform. Environments can be added later from the dashboard.
Initial Setup Workflow #
Create Tenant
↓
Create Site
↓
Add Environment (Optional)
Step 1: Create Your First Tenant #
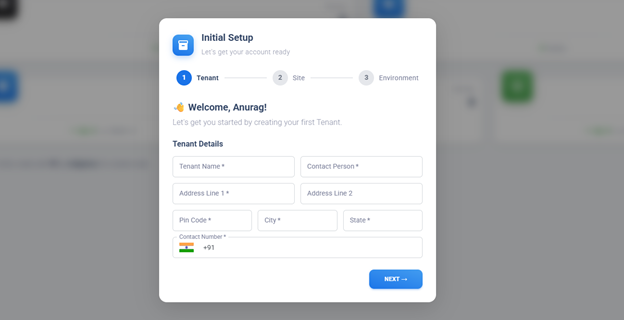
A Tenant represents your organization inside NiralOS EDGE.
Fill in the required information.
Tenant Details
| Field | Description |
|---|---|
| Tenant Name | Name of your organization |
| Address Line 1 | Primary address |
| Address Line 2 | Additional address (Optional) |
| City | Organization city |
| State | State or Province |
| Pin Code | Postal / ZIP Code |
| Contact Person | Primary contact person |
| Contact Number | Contact phone number |
After completing all mandatory fields, click Next.
The Tenant is created and you will automatically proceed to the Site creation step.
Step 2. Create Your First Site #
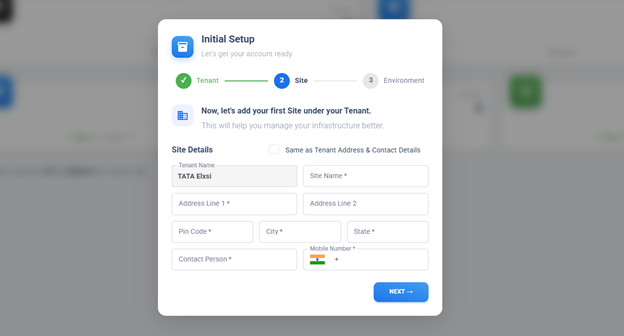
A Site represents a physical location belonging to a Tenant.
Examples include:
- Headquarters
- Factory
- Warehouse
- Branch Office
- Retail Store
- Data Center
Enter the following information.
Site Details
| Field | Description |
|---|---|
| Site Name | Name of the site |
| Address Line 1 | Site address |
| Address Line 2 | Additional address (Optional) |
| City | Site city |
| State | Site state |
| Pin Code | Postal / ZIP Code |
| Contact Person | Site administrator |
| Mobile Number | Contact phone number |
Site Located at Tenant Headquarters
If the Site is located at the same address as the Tenant Headquarters, enable:
✔ My Site is located at the same Tenant Address
The address fields will automatically be populated using the Tenant address.
Only the Site Name and contact details need to be completed.
If the Site is located elsewhere, leave this option unchecked and enter the Site address manually.
Click Next to continue.
Step 3. Add Your First Environment #
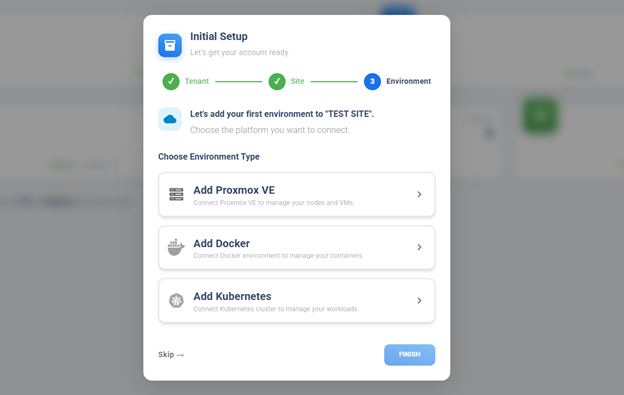
The final step is connecting infrastructure that will be managed by NiralOS EDGE.
Choose one of the supported environment types:
- Proxmox VE
- Docker
- Kubernetes
If you are not ready to connect infrastructure, click Skip. You can add environments later from the dashboard.
Add a Proxmox Environment #
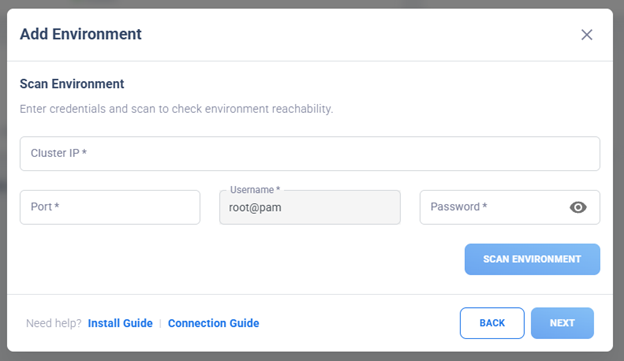
Select Add Proxmox.
Provide the following information.
| Field | Description |
|---|---|
| Proxmox IP Address | IP address of the Proxmox server |
| Port | HTTPS API Port (Default: 8006) |
| Username | root@pam |
| Password | Password for the root@pam account |
Important
NiralOS EDGE requires administrator-level access to communicate with the Proxmox API. Always use the root@pam account.
Click Check Connection.
If the connection is successful, enter an Environment Name.
Examples:
- Production Cluster
- Bangalore Hypervisor
- Branch Office
Click Finish.
The Proxmox environment is now ready to be managed by NiralOS EDGE.
Add a Docker Environment #
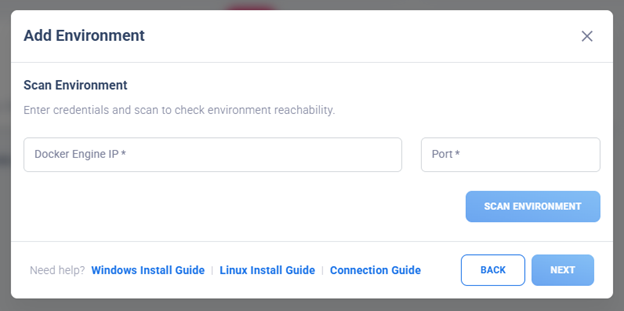
Select Add Docker
Provide the following details.
| Field | Description |
|---|---|
| Docker API IP | IP address of the Docker host |
| Docker API Port | Docker Remote API Port |
| Enable TLS | Enable if Docker API is secured using TLS |
| TLS Certificate | Upload the CA certificate when TLS is enabled |
If TLS is enabled, upload the required certificate before checking connectivity.
Click Check Connection.
Once the connection succeeds, provide an Environment Name.
Click Finish.
The Docker host is now managed by NiralOS EDGE.
Add a Kubernetes Environment #
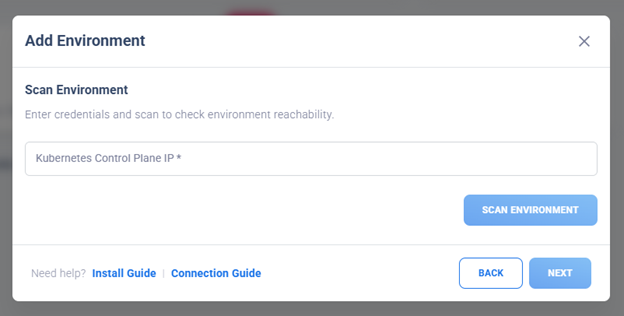
Select Add Kubernetes.
Provide the following information.
| Field | Description |
|---|---|
| Kubernetes API Server IP | Kubernetes control plane endpoint |
Click Check Connection.
After a successful connection:
- Enter an Environment Name.
- Click Finish.
NiralOS EDGE automatically deploys its Edge Agent into the Kubernetes cluster using the uploaded kubeconfig file.
The agent is exposed through a NodePort service, allowing NiralOS EDGE to securely communicate with the cluster for workload orchestration.
Skip Environment Setup #
If you choose to skip this step, click Skip.
You can add environments later by navigating to:
Infrastructure → Environments
Initial Setup Complete #
Once all steps are completed, you will be redirected to the NiralOS EDGE Dashboard.
From here, you can:
- Manage Tenants
- Manage Sites
- Add additional Environments
- Deploy Applications
- Monitor Infrastructure
- Configure Policies


