
This guide explains how to install NiralOS EDGE using the interactive installer. The installer automatically provisions all required services and configures the platform for first-time use.
Before You Begin #
Ensure your system meets the following minimum requirements before starting the installation.
Minimum System Requirements
| Requirement | Minimum |
|---|---|
| CPU | 4 vCPUs |
| Memory | 4 GB RAM |
| Storage | 20 GB free disk space |
| Network | Active Internet connection |
| Container Runtime | Docker Engine installed and running |
Important
- Docker Engine must already be installed before running the installer.
- The current user must have permission to access the Docker daemon.
- Use Windows PowerShell on Windows.
- Use the Terminal application on Linux or macOS.
Step 1. Run the Installer #
Choose the installation command based on your operating system.
Linux / macOS Open a terminal and run:
curl -fsSL https://niraledge.com/install.sh | bash
Windows
Open Windows PowerShell and run:
irm https://niraledge.com/install.ps1 | iex
After the command is executed, the interactive installer starts automatically.
Step 2. Accept the End User License Agreement (EULA) #
The installer displays the End User License Agreement. Carefully review the agreement.
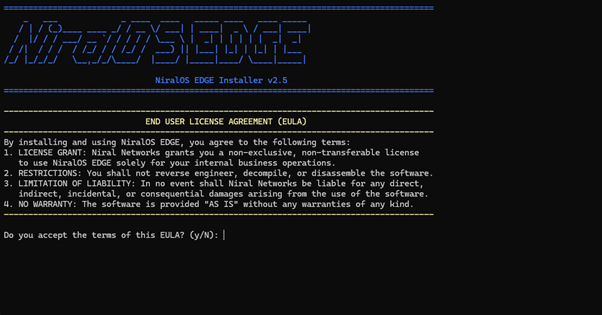
To continue the installation, type:
Yes. The installation proceeds only after the agreement is accepted.
Step 3. Configure the Management IP Address #
The installer prompts for the Management Static IP Address.
Enter the static IP address that is currently assigned to the machine where NiralOS EDGE is being installed.
Example:
Management IP: 192.168.1.50
Important
This IP address is used to configure the platform’s reverse proxy and becomes the primary endpoint for accessing the NiralOS EDGE dashboard.
Ensure:
- The IP address already exists on the machine.
- It is reachable from your network.
- It remains unchanged after installation.
Step 4. Create the First Administrator Account #
Next, the installer creates the initial user account.
Provide the following information when prompted:
| Field | Description |
|---|---|
| First Name | Administrator’s first name |
| Last Name | Administrator’s last name |
| Email Address | Login email for NiralOS EDGE |
| Password | Password for the administrator account |
Example
First Name: John | Last Name: Doe
Email: john@example.com | Password: ********
This account becomes the first user of the platform and is used to access the dashboard after installation.
Step 5. Provisioning #
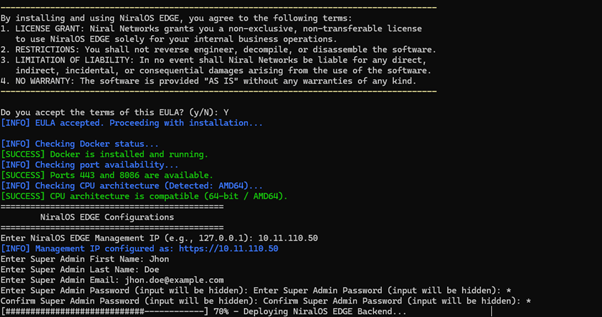
Once all required information has been entered, the installer automatically provisions the NiralOS EDGE platform.
During this process, the installer:
- Validates the installation environment
- Configures platform services
- Creates required Docker containers
- Configures networking and reverse proxy
- Initializes the platform
- Creates the administrator account
- Starts all required services
Provisioning may take several minutes depending on the system performance and internet connection.
Step 6: Installation Complete #
When provisioning finishes successfully, the installer reports that the services are running.
The NiralOS EDGE dashboard is available at:
For example: https://192.168.1.50
Your browser may display a security warning if a self-signed certificate is being used during the initial setup. You can safely proceed if you trust your installation environment
Sign In #
Open your browser and navigate to:
Sign in using the administrator account created during installation.
| Field | Value |
|---|---|
| Username | Email address entered during installation |
| Password | Password entered during installation |
After signing in, you can begin configuring tenants, sites, infrastructure, and workloads within NiralOS EDGE.
Troubleshooting #
Docker Engine Not Installed
If Docker Engine is unavailable or not running, the installer cannot continue.
Verify that:
- Docker Engine is installed.
- Docker is running.
- Your user has permission to execute Docker commands.
Insufficient Resources #
If the system does not meet the minimum hardware requirements, installation may fail or platform performance may be affected.
Verify that the system has:
- 4 vCPUs
- 4 GB RAM
- 20 GB free storage
Unable to Access the Dashboard #
If the dashboard cannot be reached:
- Verify that the Management IP entered during installation is correct.
- Ensure the IP address is assigned to the host machine.
- Confirm that the system firewall allows HTTPS traffic (TCP port 443).
- Verify that all installer services completed successfully.


